
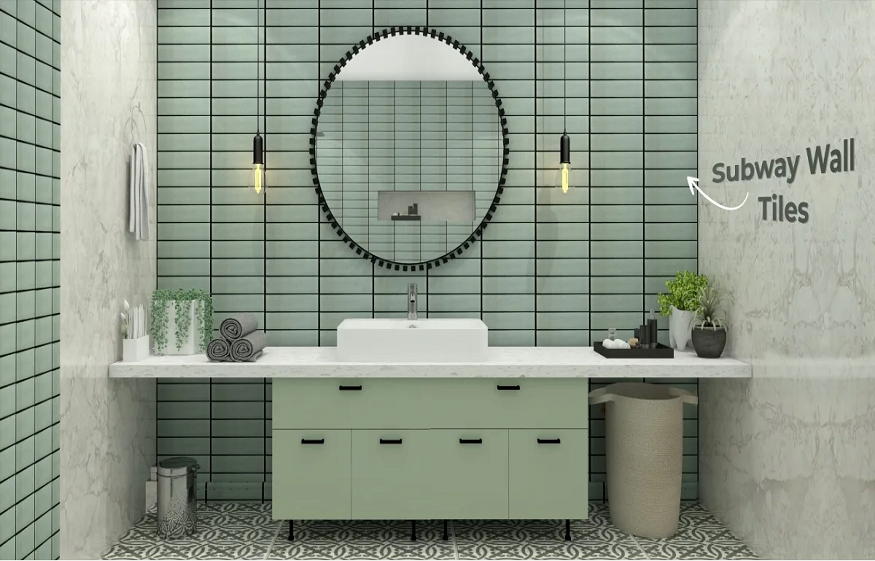
Understanding Sensitive Applications of Subway Tiling: How Subway Tile Specification Solves Modern Renovation Challenges

173 Views
Renovating an older home rarely gives you a perfectly prepared surface. You’re working around walls that have moved slightly, floors that have been built up over the years, existing cabinetry, plumbing and all those awkward little junctions that only become obvious once the old finishes come off. That’s why choosing subway tile is only part of the decision. What matters just as much is whether the tile, installation and existing space can work together.
1. A Thinner Wall Tile Can Make Renovation Details Easier
One advantage of a wall-rated subway tile is that it generally doesn’t need the same construction as a floor tile. Because it isn’t carrying foot traffic, manufacturers can produce some wall tiles in relatively thin, lightweight formats.That can be useful in an older renovation where every millimeter matters.
Adding a thick tile, adhesive layer or additional backing can gradually push a finished wall further into the room. Suddenly, a cabinet doesn’t sit quite where it used to, a window return becomes tighter, or the tile finishes proud of the surrounding trim.
A thinner Subway Wall Tile can make those transitions easier to manage, particularly around cabinetry, door frames, windows and other finished surfaces.But thinner doesn’t automatically mean better. The existing wall still has to be sound enough to receive the installation. Covering a poor substrate with a lightweight tile doesn’t magically make the substrate good.
This becomes particularly important with the longer subway formats now popular in modern kitchens and bathrooms. A thin 3×12 or 4×12 tile may look light, but its larger surface makes wall preparation more important. If the substrate isn’t properly prepared, those long, clean lines can make imperfections surprisingly obvious.
2. Installation is Key: A Bigger Subway Tile Doesn’t Hide a Bad Renovation
Longer subway tiles can give a backsplash or bathroom wall a much cleaner appearance, partly because fewer grout joints interrupt the surface. But there’s an irony here: the cleaner the pattern, the more visible poor preparation can become.
Read More: Bamboo Flooring: Eco-Friendly and Durable
An older wall might look acceptable when it’s covered with small tiles. Put a larger subway format across it and suddenly dips, uneven corners and inconsistent planes start affecting the finished lines.
This is why simply removing the old tiles isn’t always enough.Before laying a new subway installation, an experienced professional may need to deal with:
- Old adhesive and surface residue
- Uneven plaster or backer board
- Walls that aren’t square
- Movement or deterioration
- Changes in wall depth around openings.
If you’re investing in a modern elongated subway tile, spending a little more time getting the wall right can be far more valuable than spending that money on a more expensive tile.
3. Choose Placement Wisely: Subway Tiles Cannot Waterproof a Wall without Support
This distinction is easy to overlook because a finished subway installation looks completely solid. Even though porcelain or ceramic subway tiles have very low water absorption, the tile itself is not a waterproofing system.
In a shower or high-moisture area, true moisture protection depends on the hidden layers that sit behind and beneath the visible finish.That matters enormously when a renovation involves converting an existing room into a bathroom or replacing an aging shower.
The specialist’s attention therefore has to move beyond the tile face:
- Are the wall substrates (like cement board or foam panels) properly installed?
- Is a liquid or sheet waterproofing membrane applied to block moisture?
- Are vapor barriers and plumbing penetrations correctly sealed?
- Are corners, changes of plane, and floor slopes towards the drain properly treated?
A neat subway pattern and sealed grout joints may look watertight, but the performance of the overall wet-area system depends on much more than what you can see. A beautiful subway wall cannot compensate for poor construction behind it.
4. Subway Tile Thickness Can Change Your Finished Levels
Here’s a renovation issue that often gets discovered when it’s already too late. Variations in the combined thickness of the substrate, adhesive bed, and tile can create tripping hazards on floors or misalignments with cabinetry and trim on walls.
Read More: The Modern Charm of Glass Tile
On a wall, that may affect cabinetry, trim or stone. On a floor, it can create a noticeable height difference between the newly tiled room and the adjoining space.
Imagine replacing a thin existing tile with a thicker porcelain subway-style floor product. The new surface may finish higher than the hallway. Or perhaps a new subway backsplash now sits proud of the surrounding plaster, creating an awkward edge beside the cabinetry.
Good subway tiling therefore involves thinking about the edges as much as the center of the wall.
That means planning junctions around:
- Bench-tops and cabinets
- Doorways and architraves
- Timber flooring
- Shower thresholds
- Skirting and trim.
Those details rarely appear in the tile showroom. They appear in the finished renovation—and that’s where professional installation earns its value.
In essence, subway tile may look simple, but renovation rarely is. The right result depends on much more than color and pattern. Tile thickness, format, and substrate condition, waterproofing and finished levels all have to make sense together. Get those decisions right before installation, and the finished subway wall can look effortless. And ironically, that effortless appearance usually comes from a lot of careful work that nobody ever sees.

More Stories
Bamboo Flooring: Eco-Friendly and Durable
Bamboo flooring has grown in popularity over the past two decades as an eco-friendly alternative to traditional hardwood. Known for...
The Modern Charm of Glass Tile
Glass tile is an innovative and stylish option that has gained popularity in contemporary design. Its versatility, luminous quality, and...
What Are The Advantages Of Using PVC Flooring In Gyms?
Some time ago, There was a list of 9 types of floors to use in gyms, among which it was...
How to choose your floor covering?
Each type of floor has its own properties and qualities, but the choice of a floor covering is above all...
10 ideas to dress the floor of your entrance
The entrance to the house is a pivotal area. It is indeed she who sets the tone and leaves to guess all the...